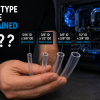
How to Leak Test Your Watercooling Loop
Custom watercooling loops grab plenty of attention for good reason. The thermal headroom, the aesthetic flexibility, the sheer satisfaction of a well-routed hardline build. But there is one step in the process that separates a successful build from a very expensive paperweight, and that is the leak test. A leak onto a powered motherboard or graphics card can cause permanent, irreparable damage in seconds. The good news? A proper leak test takes very little effort, just a bit of patience. Let’s walk through it.
Why Bother Leak Testing?
Your watercooling loop routes liquid directly over the most expensive components in your PC. If a fitting weeps or a tube pops loose while your system is powered on, coolant will find its way onto live electronics. We are talking dead GPUs, fried motherboards, and in extreme cases, systems that have caught fire. Even “non-conductive” coolants pick up dissolved metals and dust over time, making them conductive enough to bridge circuits. That is a detail worth remembering.
Component manufacturers will not cover water damage, and unlike AIO coolers, custom loops do not come with leak damage warranties. Your leak test is, quite simply, your safety net. Skipping it to save a few hours is not a risk we would ever recommend taking.
What You Will Need
- Paper towels or blue workshop roll (blue shows moisture better than white)
- A PSU jumper tool or a metal paperclip
- A torch or flashlight
- A shallow tray or container to catch drips
- An air pressure leak tester (optional but highly recommended)
- Spare o-rings and a cloth
- SKU: XS-ACC-023
- MPN: 5060175585547
- EAN: 5060175585547
- Available for Collection
- SKU: WAEK-2371
- MPN: 3831109848388
- EAN: 3831109848388
- Available for Collection
Step 1: Disconnect Your Components
Before any coolant goes near your loop, disconnect all power cables from your motherboard. That means the 24-pin ATX, CPU 8-pin, GPU PCIe power, SATA, front panel connectors, everything. The only thing left connected to your PSU should be your pump (via SATA or Molex).
The logic here is straightforward. If something does leak during testing, there is no power going to anything that matters. Coolant on a dead motherboard is just a mess to clean up. Coolant on a live motherboard is a very expensive mistake. The distinction between those two outcomes is simply whether you remembered to unplug everything first.
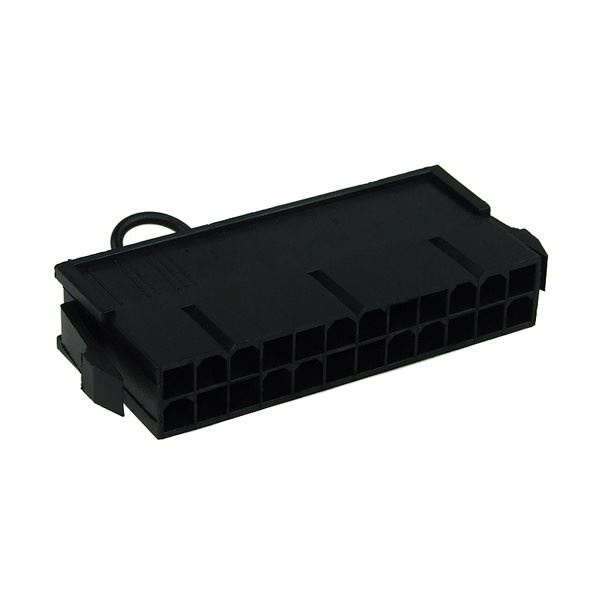
Step 2: The PSU Jumper
With your motherboard disconnected, you need a way to power the pump on its own. This is where a PSU jumper comes in.
On the 24-pin ATX connector, you bridge Pin 16 (PS_ON) to Pin 17 (Ground). This tricks the PSU into turning on without a motherboard attached. You can do this with a bent paperclip, but we would recommend picking up a proper PSU bridge tool for a few quid. They plug straight in with no guessing which pin is which, and that is especially important on modern PSUs with all-black cables where you cannot rely on wire colours.
One important caveat: always keep the PSU switched off at the back when inserting or removing the jumper. This is not the step to rush.
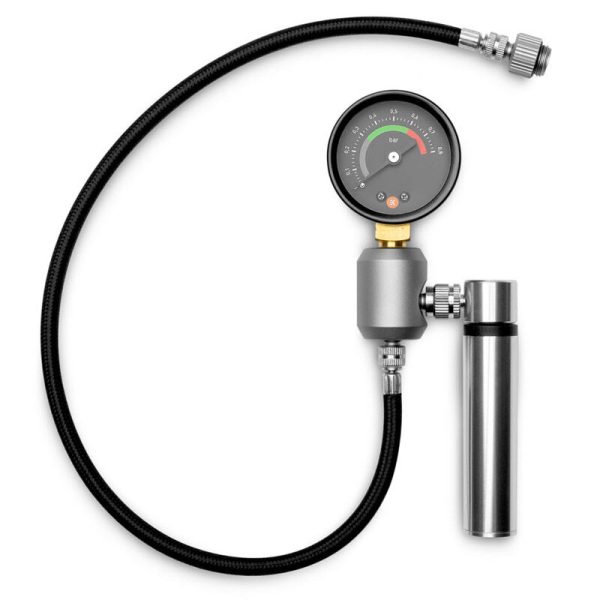
Step 3: Pressure Test Your Loop
These days, most builders start with an air pressure test before any liquid goes near the loop, and for good reason. A pressure leak tester lets you pressurise the entire loop with air and watch a gauge. If the needle drops, you have got a leak, and you have found it without a single drop of coolant going anywhere near your hardware. Very useful indeed.
Connect the tester to any spare G1/4 port (making sure all other open ports have stop plugs fitted), pump it up to around 0.3-0.5 bar, and wait 15 minutes. If the gauge holds steady, you are in good shape to move on to filling.
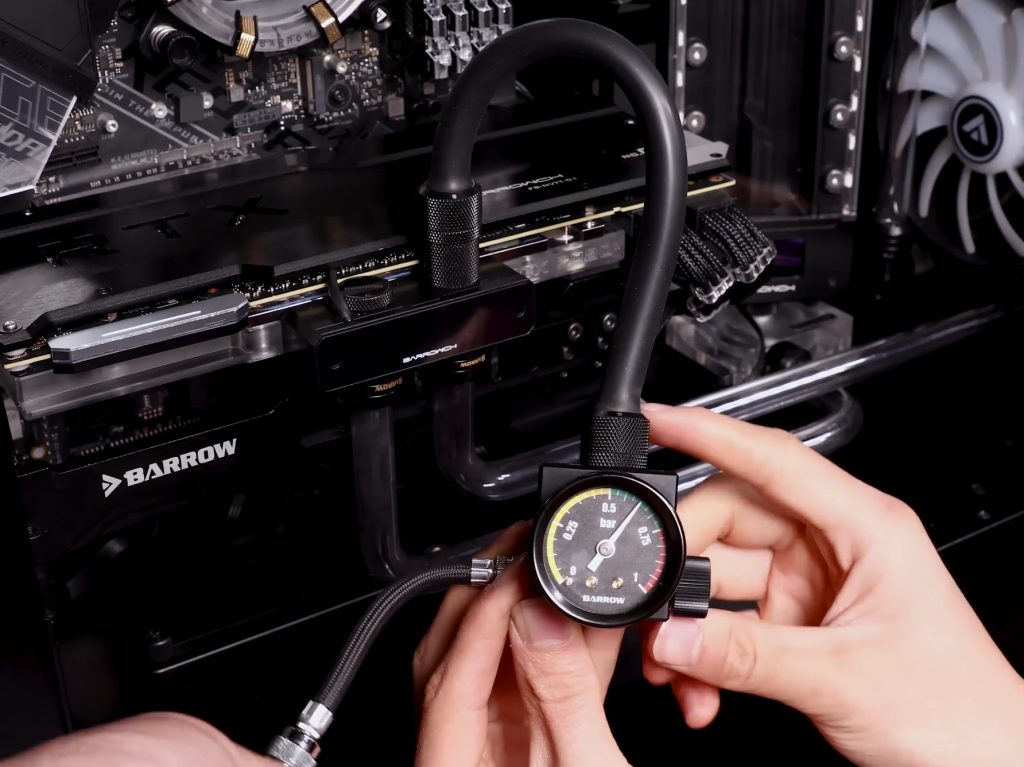
If it drops, use a bit of soapy water dabbed around fittings with a cotton bud. Escaping air will blow visible bubbles right at the leak point. Fix the issue, re-pressurise, and test again.
Pressure testing is also superb for checking individual radiators before you even install them. Plug all the ports with stop plugs, connect the tester to one, and you will know straight away if the unit arrived with any shipping damage. We have seen enough radiators with pinhole leaks from transit to consider this step well worth the additional few minutes.
One thing to keep in mind: air and water do behave differently, so a clean pressure test does not mean you can skip the wet test entirely. But it does mean you can fill with considerably more confidence.
Step 4: Fill and Run
Once you are happy with the air test (or if you are going straight to wet testing), fill the reservoir with your chosen coolant. Before you power the pump, double-check your drain valve is closed. You would be surprised how often this catches people out.
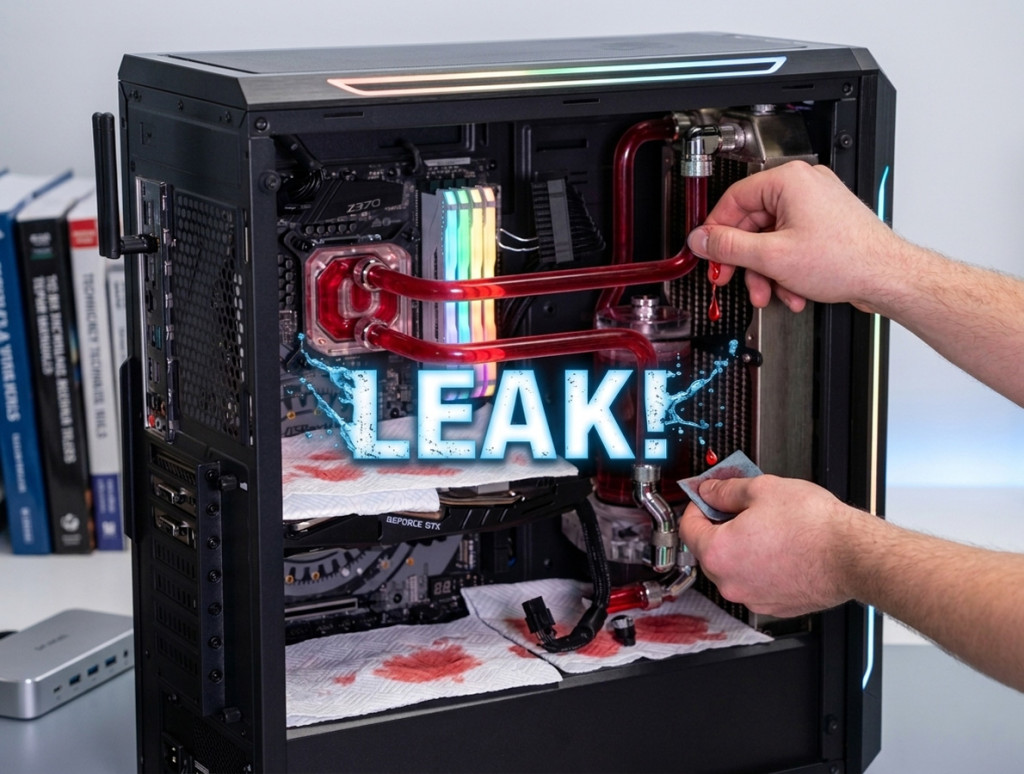
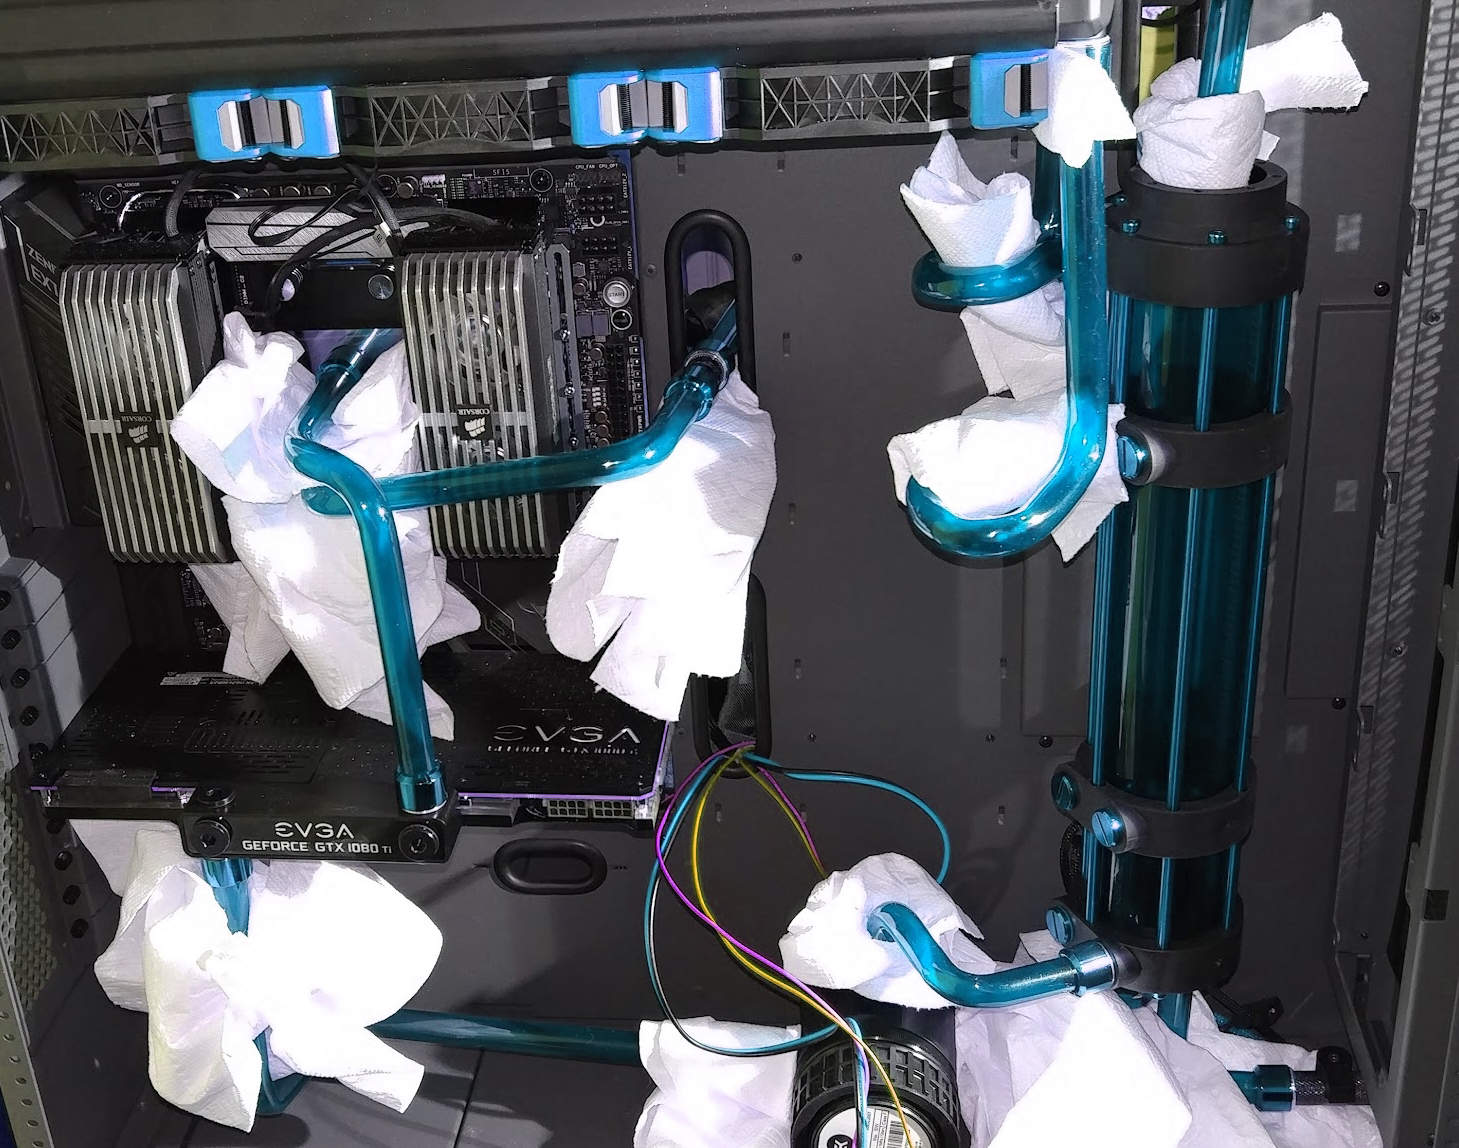
Now, wrap paper towels around every single fitting in the loop. Every compression collar, every G1/4 connection, every block inlet and outlet, every radiator port. Tuck them underneath components too, particularly under the GPU block area and at the bottom of the case. This is your early warning system, and it costs essentially nothing.
Switch the PSU on at the back. The pump should fire up and coolant will start flowing through the loop. Watch the reservoir level drop as coolant fills radiators, blocks, and tubing. When the level gets low, switch off, top up, switch on again. Repeat until the level stabilises and air bubbles settle down.
Step 5: Watch and Wait
This is the part that requires patience. With the pump running, do a visual inspection of every fitting using a torch. Shine it at an angle across fitting surfaces. Moisture glistens under torchlight, making even tiny amounts of coolant visible that you would otherwise miss entirely.
Check at 30 minutes, then 1 hour, then 2 hours, then 4 hours. Then leave it running overnight.
How long should you test? The gold standard is 24 hours. We know that sounds like a lot when you are itching to fire up your new build, but here is the thing: some leaks do not show up for hours. O-rings can take time to seat properly. Fittings expand slightly as coolant warms up. A fitting that is perfectly dry for 3 hours might start weeping at hour 8. We have seen it happen.
If you have done an air pressure pre-test and everything held perfectly, you can be fairly confident after 6-8 hours. But if this is your first build, give it the full 24 hours. The cost of patience is zero. The cost of a dead GPU is a lot more than that.
Common Leak Points to Watch
After years of custom loop building, these are the usual suspects:
- Under-tightened fittings. The most common cause by a considerable margin. G1/4 fittings should be hand-tight plus a gentle snug. The o-ring does the sealing, not the threads.
- Drain valve left open. Happens more often than anyone cares to admit.
- Missing or pinched o-rings. Always check the o-ring is present and seated properly before screwing in a fitting. Cross-threading can pinch and tear them, and that is a needlessly frustrating leak to diagnose.
- Hard tube not fully seated. The tube needs to pass both internal o-rings in the fitting. If it is only past the first one, it will leak.
- Rotary fittings. Angled and rotary adapters have internal o-rings that can wear over time. Give these extra attention during your inspections.
- Shipping-damaged radiators. Worth testing each radiator individually with stop plugs before installing in your case, as we mentioned above.

What To Do If You Find a Leak
Do not panic. Switch off the PSU immediately.
- Identify the source using the wet patch on your paper towels. Coolant travels downward, so a wet patch directly below a fitting points straight to it.
- Try tightening the fitting first. Many leaks are simply a fitting that needed another quarter turn. Straightforward.
- If it is already tight, remove the fitting and inspect the o-ring. Look for tears, pinching, or debris on the sealing surface. Replace the o-ring if in doubt.
- For hard tube leaks, remove the tube and check the end is properly chamfered and deburred. A rough tube end can slice the o-ring inside the fitting, and that is a problem no amount of additional tightening will resolve.
- After any fix, re-test. Do not assume it is sorted. Run the leak test again for at least a few hours. This step is not optional.
After a Successful Test
Once you have had a clean 12-24 hour test with no signs of moisture on any paper towels, the process is as follows:
- Switch off the PSU and remove the jumper
- Reconnect all your motherboard power cables
- Remove the paper towels
- Top up the reservoir one final time (the level drops slightly as remaining air bleeds out)
- Power on and boot into BIOS first to check temperatures
Keep an eye on your fittings for the first week of use. Check visually every day or so, and give each fitting a gentle feel to make sure nothing has loosened. A few seconds of visual inspection per day is a trivially small price to pay for the peace of mind it provides.
One final point worth noting: if you ever transport your watercooled PC, check all fittings when you arrive. Vibration from travel can loosen connections. A quick 30-minute test with paper towels before powering on could save your entire build. The cost of that precaution is, again, zero. The cost of skipping it could be substantial.